This recipe provides your with a formula and a template to achieve the perfect cinnamon buns while giving you choices and options. Let me walk you through these.
My preferred liquid of choice is plain yogurt (not Greek) - it will result in moist, light as air buns.
The next option is buttermilk or milk. Also another magnificent result. This option may require more flour.
And if you want to get really creative, use 1/2 cup milk or buttercream and 1/4 cup yogurt!
Follow the instructions in steps 2 and 3 closely to determine the total amount of flour you will need.
With respect to the baking pan of choice - I prefer 8x8 or 9x9 glass square pan. The buns are more visually appealing and taller when baked in a smaller dish, in my opinion. But nothing is stopping you from baking your buns in 9x13 pan, just cut your cinnamon dough log into 12 equal pieces instead of 9 pieces that I recommend in Step 9.
In the bowl of your stand mixer, whisk the cooled melted butter, sugar, lightly beaten eggs and the liquid of choice. Add 2 cups of flour, yeast and kosher salt and mix well with a wooden spoon until combined and the flour is fully incorporated. Add another 1/2 cup of flour and knead on low.
The total flour you will need will depend on a few variables, including the liquid you have chosen. It's important not to add the flour all at once when it comes to enriched dough like this one. Start with 2 1/2 cups as suggested in step 2, then keep adding the flour a tablespoon or so at a time, until the dough just starts to pull away from the bowl of your mixer. The dough should be soft, moist but not sticky. This is the perfect formula - you can get creative with any liquid as discussed in step 1 and still have consistently amazing results.
Kneading the dough long enough is also very important to properly develop the gluten. 10 minutes on low is the minimum (in your stand mixer,) but I prefer to go for 15. Be sure to check on your mixer and ensure it's not overheating.
When done, transfer your dough to a large lightly oiled bowl, cover with plastic wrap, place a damp towel over the bowl and allow the dough to rise for 2 hours. Ensure your bowl is large enough as the dough will at the very least double in size.
Another trick I use is creating a bit of goo on the bottom of your baking dish. I don't like how the top of the cinnamon buns looks as it may look a bit dry. However, if you put a bit of butter and a bit of sugar on the bottom, similarly to what you would do with the sticky buns (just a lot less), when you invert your rolls you will have shiny, flat, perfect area for glazing. As such, spread about 2 TBSP of butter and 2 TBSP light brown sugar on the bottom of your baking dish.
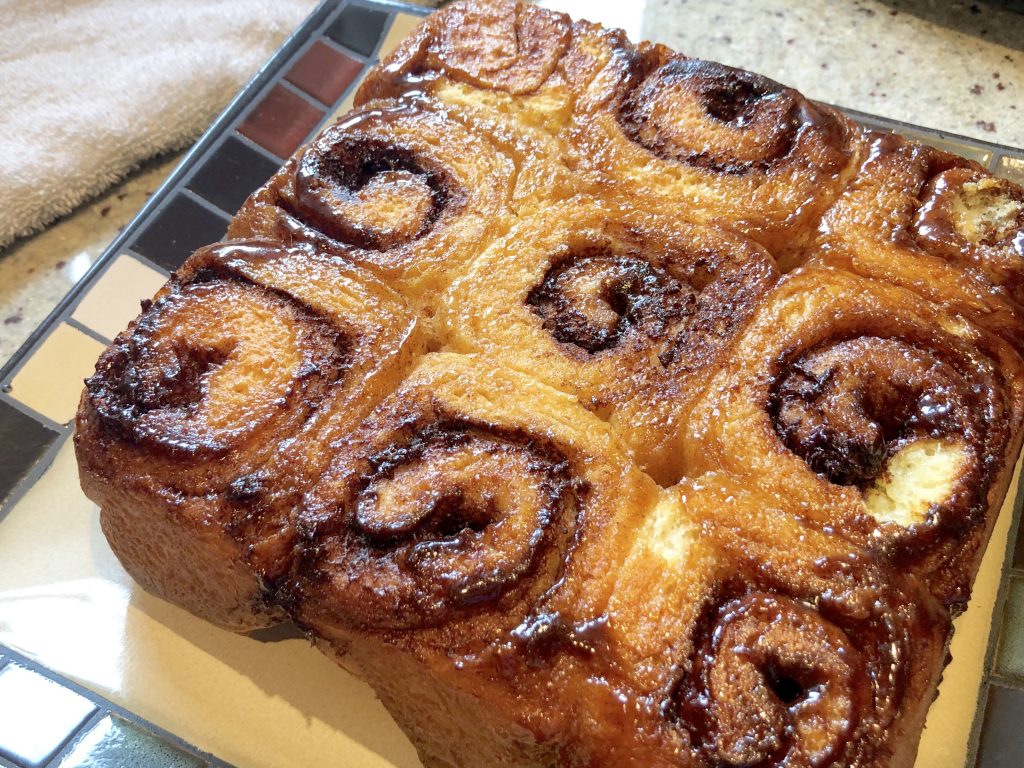
Place all of the Goo ingredients into a pan and set the pan over medium heat. Stirring constantly, bring the mixture to simmer and simmer for 3-5 minutes until the Goo is just starting to thicken slightly. Pour this into the prepared dish; allow to cool before adding your buns to the pan. Do not use any additional glaze with this option as it will be very sweet.
For the filling, add all your filling ingredients to the bowl of your mixer, mix on low to incorporate, then increase to high and beat for 3-5 minutes until light and fluffy.
Roll your dough into a rectangle. Now the math will come handy. The long side of the dough should be facing you. The short side of the dough should be between 8 and 9 inches.
If baking your rolls in 8x8 pan - the length of your dough should be 13.5" and each slice should be 1 1/2". If the dough still appears too thick (the thickness should be between 1/4 and 3/8 of an inch), keep rolling yoru dough into a longer log. Just ensure to cut the log into 9 even pieces (or 12 if baking in a larger pan.)
Spread the filling all over the surface, leaving a very small strip at the long edge at the top (so that it can adhere after its rolled.) Starting at the bottom edge, roll the dough into a log. Ensure the seam is on the bottom. Slice the log into 9 or 12 buns, depending on the pan you will be using.
Place your sliced buns into the prepared pan. Cover tightly with plastic wrap and allow to rise for 2 hours until puffed and the buns fill the entire pan.
Half an hour before you are ready to bake, preheat your oven to 350°.
NOTE: after our buns are filled, sliced, placed into the baking sheet and covered with plastic - you can place the pan in the fridge overnight. Take the pan out of the fridge and allow to rise at room temperature for 2 hours prior to baking the next day.
Bake the risen buns in preheated oven (be sure to remove the towel and plastic wrap) for around 28-35 minutes. The buns should be firm, golden and the internal temperature in the middle should be 190°.
To make the glaze, choose one of two options - cream cheese glaze or simple glaze:
For simple glaze, combine powdered sugar, salt and only enough milk to thin it out into thick but spreadable consistency.
For cream cheese option, beat cream cheese in a mixer, or even with a wooden spoon, add powdered sugar, salt and milk until thick but spreadable consistency.
Do not make the glaze if you are going with option 2 for the sticky cinnamon buns. They will be plenty sweet without the glaze!
When ready, remove the buns from the oven and allow to sit for a few minutes. Get another large platter, a baking sheet would work well and carefully (the caramel at the bottom will be very hot), invert the buns onto it. Glaze with the glaze of choice for Option 1. Dig in and enjoy!
If you happen to have leftovers, these will store beautifully in an airtight container at room temp for a couple of days.
Ingredients
Directions
This recipe provides your with a formula and a template to achieve the perfect cinnamon buns while giving you choices and options. Let me walk you through these.
My preferred liquid of choice is plain yogurt (not Greek) - it will result in moist, light as air buns.
The next option is buttermilk or milk. Also another magnificent result. This option may require more flour.
And if you want to get really creative, use 1/2 cup milk or buttercream and 1/4 cup yogurt!
Follow the instructions in steps 2 and 3 closely to determine the total amount of flour you will need.
With respect to the baking pan of choice - I prefer 8x8 or 9x9 glass square pan. The buns are more visually appealing and taller when baked in a smaller dish, in my opinion. But nothing is stopping you from baking your buns in 9x13 pan, just cut your cinnamon dough log into 12 equal pieces instead of 9 pieces that I recommend in Step 9.
In the bowl of your stand mixer, whisk the cooled melted butter, sugar, lightly beaten eggs and the liquid of choice. Add 2 cups of flour, yeast and kosher salt and mix well with a wooden spoon until combined and the flour is fully incorporated. Add another 1/2 cup of flour and knead on low.
The total flour you will need will depend on a few variables, including the liquid you have chosen. It's important not to add the flour all at once when it comes to enriched dough like this one. Start with 2 1/2 cups as suggested in step 2, then keep adding the flour a tablespoon or so at a time, until the dough just starts to pull away from the bowl of your mixer. The dough should be soft, moist but not sticky. This is the perfect formula - you can get creative with any liquid as discussed in step 1 and still have consistently amazing results.
Kneading the dough long enough is also very important to properly develop the gluten. 10 minutes on low is the minimum (in your stand mixer,) but I prefer to go for 15. Be sure to check on your mixer and ensure it's not overheating.
When done, transfer your dough to a large lightly oiled bowl, cover with plastic wrap, place a damp towel over the bowl and allow the dough to rise for 2 hours. Ensure your bowl is large enough as the dough will at the very least double in size.
Another trick I use is creating a bit of goo on the bottom of your baking dish. I don't like how the top of the cinnamon buns looks as it may look a bit dry. However, if you put a bit of butter and a bit of sugar on the bottom, similarly to what you would do with the sticky buns (just a lot less), when you invert your rolls you will have shiny, flat, perfect area for glazing. As such, spread about 2 TBSP of butter and 2 TBSP light brown sugar on the bottom of your baking dish.

Place all of the Goo ingredients into a pan and set the pan over medium heat. Stirring constantly, bring the mixture to simmer and simmer for 3-5 minutes until the Goo is just starting to thicken slightly. Pour this into the prepared dish; allow to cool before adding your buns to the pan. Do not use any additional glaze with this option as it will be very sweet.
For the filling, add all your filling ingredients to the bowl of your mixer, mix on low to incorporate, then increase to high and beat for 3-5 minutes until light and fluffy.
Roll your dough into a rectangle. Now the math will come handy. The long side of the dough should be facing you. The short side of the dough should be between 8 and 9 inches.
If baking your rolls in 8x8 pan - the length of your dough should be 13.5" and each slice should be 1 1/2". If the dough still appears too thick (the thickness should be between 1/4 and 3/8 of an inch), keep rolling yoru dough into a longer log. Just ensure to cut the log into 9 even pieces (or 12 if baking in a larger pan.)
Spread the filling all over the surface, leaving a very small strip at the long edge at the top (so that it can adhere after its rolled.) Starting at the bottom edge, roll the dough into a log. Ensure the seam is on the bottom. Slice the log into 9 or 12 buns, depending on the pan you will be using.
Place your sliced buns into the prepared pan. Cover tightly with plastic wrap and allow to rise for 2 hours until puffed and the buns fill the entire pan.
Half an hour before you are ready to bake, preheat your oven to 350°.
NOTE: after our buns are filled, sliced, placed into the baking sheet and covered with plastic - you can place the pan in the fridge overnight. Take the pan out of the fridge and allow to rise at room temperature for 2 hours prior to baking the next day.
Bake the risen buns in preheated oven (be sure to remove the towel and plastic wrap) for around 28-35 minutes. The buns should be firm, golden and the internal temperature in the middle should be 190°.
To make the glaze, choose one of two options - cream cheese glaze or simple glaze:
For simple glaze, combine powdered sugar, salt and only enough milk to thin it out into thick but spreadable consistency.
For cream cheese option, beat cream cheese in a mixer, or even with a wooden spoon, add powdered sugar, salt and milk until thick but spreadable consistency.
Do not make the glaze if you are going with option 2 for the sticky cinnamon buns. They will be plenty sweet without the glaze!
When ready, remove the buns from the oven and allow to sit for a few minutes. Get another large platter, a baking sheet would work well and carefully (the caramel at the bottom will be very hot), invert the buns onto it. Glaze with the glaze of choice for Option 1. Dig in and enjoy!
If you happen to have leftovers, these will store beautifully in an airtight container at room temp for a couple of days.


