If you’ve ever thought pavlovas were too tricky to make at home, think again! After perfecting my bacon carbonara recipe, I found myself with leftover egg whites—what better way to use them than whipping up a batch of mini pavlovas? Contrary to popular belief, pavlovas are actually quite quick and easy to make, and with the right technique, they turn out absolutely perfect every time.
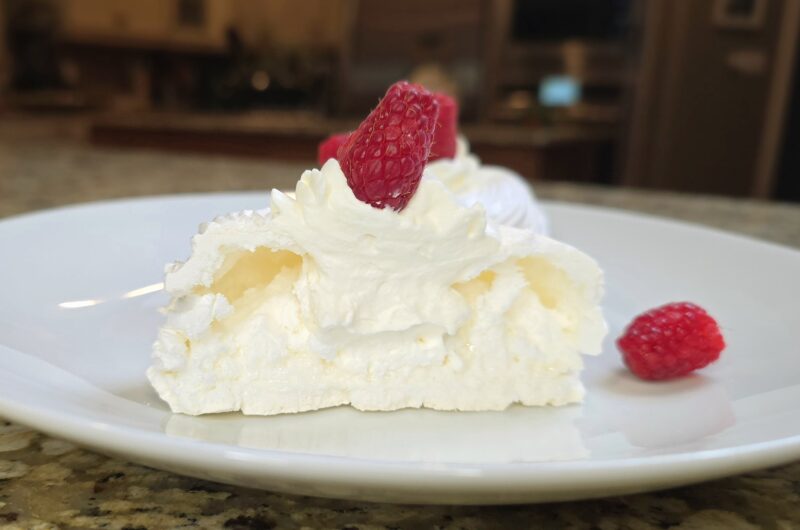
We’ve carefully developed this recipe to strike the perfect balance: a crisp, delicate shell with a soft, gooey marshmallow-like center. The secret? The right amount of cornstarch, the ideal baking temperature, and a gradual cooling process.
A Sweet History: The Surprising Origins of Pavlova
Despite being a dessert beloved worldwide, pavlova’s origin is a topic of long-standing debate between Australia and New Zealand. Both countries claim to have created this airy treat in honor of the famous Russian ballerina, Anna Pavlova, during her tour of the region in the 1920s. Legend has it that the dessert was inspired by her light and graceful movement, resembling the delicacy of a crisp yet airy pavlova.
Regardless of its true origin, pavlova has become a staple in both Australian and New Zealand cuisine, often served at celebrations and summer gatherings, topped with luscious whipped cream and fresh fruit. Whether it’s a classic large pavlova or bite-sized versions like these mini pavlovas, the dessert remains a symbol of elegance and simplicity.
Why This Recipe Works So Well
Achieving the perfect pavlova texture comes down to science and precision. Our recipe is carefully tested to deliver the best results by focusing on three key factors:
- Cornstarch for Stability:
- We use 1 tablespoon of cornstarch, which helps stabilize the egg whites and keeps the interior soft while ensuring the exterior crisps up beautifully. Some recipes use less, but this amount strikes the perfect balance.
- The Right Baking Temperature:
- Baking at 225°F (110°C) is the sweet spot. A higher temperature can cause cracking, while a lower temperature might result in a meringue that’s too chewy or sticky.
- A Gentle Cooling Process:
- After baking, the pavlovas are left in the oven with the door closed for 35 minutes, followed by an additional 15 minutes with the door open. This slow cooling process prevents cracks and ensures the interior stays marshmallowy.
Different Types of Pavlovas
If you prefer a pavlova that’s crisp all the way through, check out my Pavlova Recipe with Lemon Curd, which offers a delightful crunch and pairs perfectly with tangy lemon flavors. However, if you love the contrast between a crisp shell and a gooey, melt-in-your-mouth interior, then these mini pavlovas are the way to go.
Easy and Perfect for Any Occasion
This mini pavlova recipe is a no-fuss dessert that feels fancy but requires minimal effort. Whether you’re looking for a way to use up extra egg whites from a savory dish like carbonara or you simply want a light and elegant treat, this recipe is for you. With just a handful of ingredients and a few simple steps, you’ll have a show-stopping dessert that’s sure to impress.
And the best part? You don’t need any special equipment—just a stand mixer or a hand whisk and a little patience. These mini pavlovas are perfect for parties, holidays, or a fun baking project with kids.
Storage Tips
Storing pavlovas properly is key to maintaining their perfect texture.
- Unfilled Pavlovas: Store in an airtight container at room temperature for up to 2 days. Keep them in a cool, dry place to avoid moisture, which can soften the crispy shell.
- Filled Pavlovas: Once filled with whipped cream and toppings, they should be consumed immediately for the best texture. If necessary, store in the fridge for up to 24 hours, but be aware that they may soften over time.
- Freezing: Unfilled pavlovas can be frozen in an airtight container for up to 1 month. Thaw at room temperature before serving. Avoid refrigerating unfilled pavlovas, as humidity can make them sticky.
Tips for Success:
- Don’t overbeat the egg whites. Stop whipping as soon as stiff, glossy peaks form to avoid a dry or weeping meringue.
- Gradually add sugar. This allows for complete dissolution and a smooth texture.
- Choose a dry day to bake. Humidity is the enemy of pavlova, so try to bake on days with low moisture levels.
- Use room temperature egg whites. They whip up better and create more volume.
- For perfect shapes, pipe nests. Creating a slight rim ensures the perfect base for toppings like whipped cream and fresh fruit.
Final Thoughts
Pavlovas are truly one of the most rewarding desserts to make. The contrast of textures—crispy exterior and pillowy soft interior—makes them an irresistible treat. With this foolproof recipe, you’ll be able to enjoy beautifully crisp, marshmallowy-centered mini pavlovas that look as good as they taste.
So, next time you’re looking for a dessert that’s simple yet impressive, whip up a batch of mini pavlovas and enjoy a touch of elegance in every bite.
Gooey Mini Pavlova
Ingredients
4 large egg whites, at room temperature
1 pinch cream of tartar
1 pinch salt
1 cup granulated sugar
1 tbsp cornstarch
2 tsp lemon juice
¼ tsp vanilla extract
Directions
- Preheat the oven:
Preheat your oven to 225°F (110°C). Line two baking sheets with parchment paper. If desired, draw 8 small (3 to 3½ inches) or 6 medium circles to use as piping guides. - Prepare the sugar mixture:
In a small bowl, mix the sugar and cornstarch together. Set aside. - Whip the egg whites carefully:
Ensure your mixing bowl is completely clean and grease-free. Add the egg whites and beat on medium-low speed until they become foamy.
Add a pinch of salt and cream of tartar, then increase speed to medium and beat until soft peaks form.
Add lemon juice and vanilla extract, and continue beating for another 30 seconds.
Gradually add the sugar mixture:
With the mixer on high, add the sugar mixture one tablespoon at a time, taking about 2–3 minutes total. Scrape down the sides of the bowl once or twice to ensure full incorporation.
Continue beating only until stiff, glossy peaks form — stop immediately at this stage to avoid overbeating. The meringue should hold a sharp peak that stands upright when you lift the beater, and feel smooth (not gritty) when rubbed between your fingers.
Important:
Stop mixing as soon as stiff, shiny peaks form—overbeaten meringue can lead to a grainy texture and excess moisture release during baking. - Pipe the pavlovas:
Transfer the meringue to a large piping bag. Pipe onto the prepared baking sheets by starting with a dot in the center, spiraling outward twice to create a larger circle, then piping a rim around the edges to form a nest shape for the filling. - Bake the pavlovas:
Place the baking sheets into the preheated oven and bake for 1 hour and 15 minutes. - Cool gradually in two steps:
Once baking is complete, follow this cooling method to achieve the best texture without cracks:
Turn off the oven and leave the pavlovas inside with the door closed for 30 minutes. - Serve:
Once completely cooled, carefully remove the pavlovas from the parchment paper. Fill with whipped cream, fresh fruit, or your favorite toppings. Enjoy immediately.
Notes
- Tips for Success:
Ensure egg whites are at room temperature for optimal volume.
Gradually add sugar to allow for complete dissolution and a smooth meringue.
Store unfilled pavlovas in an airtight container at room temperature for up to 2 days.
Avoid making pavlova on humid days, as moisture can affect the crispness of the shell.
Enjoy your beautifully crisp, marshmallowy-centered mini pavlovas! - For Whipped Cream: Whip 1 cup of cold heavy


