Few cakes hold the kind of nostalgic power that the Russian Napoleon Torte does. With its delicate, flaky layers, each soaked in a luscious, saucy custard, this dessert has become a staple at many Eastern European family gatherings. The rich, buttery pastry combined with the sweet, vanilla-infused custard evokes a sense of warmth, comfort, and tradition that has stood the test of time. But where did this cake originate, and why has it become synonymous with special occasions across generations?
The History Behind Russian Napoleon Torte
Despite its French-sounding name, the Napoleon Torte has deep roots in Russian culinary history. The cake’s name is often mistakenly associated with Napoleon Bonaparte himself, with some even believing it is cut into triangles to represent his iconic bicorne hat. In reality, the cake’s origins are more culinary than military.
The Russian Napoleon Torte was first created in 1912 to commemorate the 100th anniversary of Russia’s victory over Napoleon during the Patriotic War of 1812. Russian pastry chefs developed the dessert as a tribute to the country’s resilience, with the numerous layers symbolizing the many defensive lines that protected Russia from the invading French forces. Over time, the cake evolved from a patriotic novelty into a beloved family tradition, enjoyed at birthdays, holidays, and festive gatherings.
Layers of Texture and Flavor
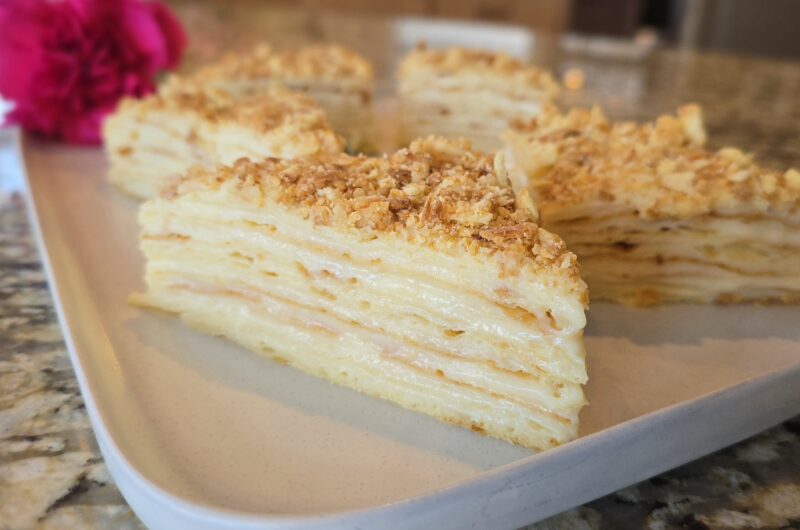
What sets the Russian Napoleon Torte apart from other layered cakes is its distinct texture. Unlike a typical mille-feuille, which often has crisp layers separated by a thin filling, the Napoleon Torte’s layers are intentionally soaked with custard. This process softens the pastry, transforming it into a tender, saucy delight that practically melts in your mouth.
The custard, often referred to as zavarnoy krem in Russian, is a simple yet luxurious blend of milk, egg yolks, sugar, flour, and butter. The result is a smooth, velvety cream that provides just the right amount of sweetness. Optional additions, such as a splash of cognac, rum, or brandy, can add a subtle depth of flavor.
Why 400 Degrees Is the Perfect Baking Temperature
The dough for this cake is typically baked at 400°F (200°C), a temperature that achieves the perfect balance of browning, crisping, and even cooking. At this heat, the layers develop a light golden hue and a delicate crunch without becoming brittle. The high temperature also helps the layers puff slightly, adding to the cake’s signature airy texture.
Fun fact: The name of this blog, Food400, was inspired by the versatility of 400°F as a go-to baking temperature. From pastries and cookies to chicken wings and roasted vegetables, 400°F is a reliable choice for achieving caramelization, crispiness, and consistent results.
The Appeal of Nostalgia and Comfort
Food has an uncanny way of transporting us to the past. A single bite of Napoleon Torte can evoke memories of crowded family kitchens, festive holiday spreads, and the comforting sounds of loved ones sharing stories. The soft, custard-soaked layers remind many of childhood desserts prepared by grandmothers who knew that the secret to great cooking was equal parts patience, precision, and love.
This cake isn’t just about the ingredients or the technique; it’s about the emotions it stirs. In many Russian, Ukrainian, and Eastern European households, Napoleon Torte is more than a dessert—it’s a tangible connection to family traditions, cultural identity, and shared history.
Napoleon Torte vs. Mille-Feuille: What’s the Difference?
While the Napoleon Torte is often compared to the classic French mille-feuille, there are key differences that set the two apart:
- Texture: Mille-feuille layers remain crisp, while Napoleon Torte layers become soft and custard-soaked.
- Filling: Mille-feuille typically uses pastry cream; Napoleon Torte uses a softer custard that’s more generously applied.
- Shape: Mille-feuille is traditionally cut into neat rectangles, while Napoleon Torte is sometimes cut into triangles, though this is a modern interpretation rather than a historical practice.
Why You Should Try Making This Cake
The Russian Napoleon Torte may seem intimidating at first, but the process is more forgiving than you might expect. The dough comes together quickly in a food processor, and the custard requires simple pantry ingredients. The true magic happens when the layers absorb the custard, creating a dessert that is as tender and saucy as it is flavorful.
Tips for Success:
- Don’t overwork the dough: Gentle folding helps create flaky layers.
- Use a fine-mesh sieve: Straining the custard ensures a silky texture.
- Be generous with the custard: More custard means softer layers.
- Allow time to set: Refrigerate the assembled cake overnight to let the flavors meld.
A Dessert with a Story
Whether you’re making Napoleon Torte to honor tradition, experiment with new recipes, or simply enjoy a delicious dessert, you’re participating in a culinary story that spans centuries. With each bite, you’re tasting the ingenuity of early 20th-century pastry chefs, the warmth of family kitchens, and the enduring appeal of simple ingredients transformed into something extraordinary.
So, if you’ve ever wondered why this cake remains popular after more than a century, the answer is simple: Nostalgia, comfort, and flavor never go out of style.
Authentic Russian Napoleon Torte (Soft & Saucy)
Ingredients
- Crust (8 Layers)
2 sticks (1 cup) unsalted butter, cold, cut into 1 inch chunks
1 cup sour cream
2 eggs
1/2 tsp fine salt
1/2 tsp baking soda
1 TBSP white vinegar or lemon juice
3 cups all-purpose flour, divided (start with 2 cups, add up to 1 more as needed), plus more for rolling
- Saucy Custard Filling
7 cups whole milk, divided (6 cups for cooking, 1 cup for mixing)
4 large egg yolks
1 1/2 cups granulated sugar
1/4 tsp fine salt
3/4 cup all-purpose flour
2 sticks unsalted butter, cut into 1 inch chunks
1 TBSP vanilla extract
Optional: 2 TBSP cognac, rum, or brandy for depth.
Directions
- Step 1: Prepare the Dough
In a food processor, combine butter, sour cream, salt, and eggs. In a small bowl, mix baking soda and vinegar, allowing the foam to subside before adding it to the processor. Pulse a few times to incorporate. Add 2 cups of flour all at once and pulse again until just combined. Turn the dough out onto a well flour surface.
Incorporate the Remaining Flour: Gradually add UP TO the remaining 1 cup of flour, a little at a time, until the dough is soft, smooth, and no longer sticky. Stop adding the flour when the dough stops sticking to your hands.
Layering Technique: Instead of kneading, fold the dough over itself like an envelope 4-5 times to develop delicate layers. If you have to knead, do so very gently. The dough should not be overworked to keep the layers delicate.
Chill: Divide into 2 equal portions, wrap in plastic wrap, and refrigerate for at least 2 hours (or overnight for best texture). - Step 3: Make the Saucy Custard
Heat the Milk: In a large saucepan, heat 6 cups of milk with vanilla over medium heat until steaming but not boiling.
Mix the Egg Base: In a separate bowl, whisk together sugar, flour, salt and the remaining 1 cup of milk. Add egg yolks and mix until smooth.
Temper the Eggs: Slowly ladle hot milk into the egg mixture, whisking constantly to prevent curdling.
Cook the Custard: Return everything to the pot and cook over medium heat, whisking constantly, until thickened to a pudding-like consistency (about 5-7 minutes). You will only need to cook it for about 1 minute after it comes to a gentle simmer. The custard should be stirred constantly when cooking to prevent lumps and burning.
Finish with Butter: Remove from heat, stir in softened butter and vanilla until smooth. Ideally, pass the mixture through a fine mesh sieve.
Optional Enhancements: Stir in cognac, rum, or brandy for depth.
Let the custard cool just a bit then place plastic wrap directly against the surface to prevent a skin from forming on top. Refrigerate until cooled completely. - Step 2: Bake the Layers
Preheat oven to 400°F (200°C).
Divide Each Dough Disc into 4 Equal Pieces (you will have 8 total). Keep the unused dough in the fridge until you need to roll it.
Roll Each Piece Thinly: Using plenty of flour, roll out each piece into a large, very thin rectangle or square (about 12x14 inches). Roll layers on parchment paper for easier transfer to the baking sheet. Prick layers thoroughly with a fork to prevent uneven puffing.
Bake Each Layer for 6-8 Minutes: Rotate the baking sheets halfway through baking (from the top to bottom racks) to ensure even browning. But watch carefully after 5 minutes because thin layers brown fast. Bake until light golden brown. Cool on the counter.
Trim the Layers: Once cooled, stack them and cut the edges with a serrated knife so they are uniform. Reserve the scraps for decorating the cake.
Crisp the Scraps: Place scraps back in the oven for 2 more minutes until golden brown, again at 400°F (200°C). Cool, then crush into fine crumbs. - Step 4: Assemble the Cake
Start Layering: Place the first pastry layer on your serving platter.
Add Custard Generously: Using a slotted spoon, spread a generous amount of custard evenly over each layer.
Continue Stacking: Repeat the process with all 8 layers, ending with a final custard layer on top.
Decorate with Crumbs: Crush the baked pastry scraps into fine crumbs and press onto the top and sides of the cake.
Let It Set: Cover with plastic wrap and let soak at room temperature for 2 hours.
Trim for a Clean Look, Optional: Use a sharp knife to remove uneven edges. - Step 5: Chill & Serve
Refrigerate for at least 6 hours, preferably overnight to let the flavors meld.
Napoleon tastes best at slightly cooler than room temperature.
Cut into triangles or rectangles and serve!
Notes
- Consider increasing sugar by 2 TBSP in the custard for a slightly sweeter touch. I can also see increasing this recipe by 50% and making 12 layers instead for a taller cake!