Brioche is often described as “a cake disguised as bread”, a luxurious balance of buttery richness and feathery softness. It straddles the line between pastry and bread, and when done right, it’s utterly divine—the kind of bread that melts on your tongue yet holds its shape, perfect for French toast, bread pudding, or simply tearing apart with your hands while it’s still warm.
But here’s the thing: Brioche is not an easy recipe.
If you’re going to make brioche, you must be willing to commit.
This is not the kind of bread you can throw together in an afternoon, nor is it a recipe that forgives shortcuts. Precision is everything.
In this recipe, I’ve taken bakery-level formulations from world-class pastry chefs—think Thomas Keller (Bouchon Bakery), Dominique Ansel (Cronut fame), and French culinary schools like Le Cordon Bleu—and adapted them for home bakers who want to achieve the same professional results without commercial equipment.
That means balancing artisan technique with practical modifications—like slightly more yeast than a Michelin-starred bakery might use, ensuring a reliable and structured rise at home.
So if you’re serious about making brioche, read on. Follow every step precisely, and I promise, this will be the best brioche you’ve ever made.
What Makes This Brioche Special?
This recipe is built on true French techniques, but I’ve fine-tuned it to make it work in a home kitchen.
✔ We use a sponge (pre-ferment)—the same method used in Keller’s Bouchon Bakery—to develop depth of flavor before the dough even comes together. This step allows the yeast to thrive, ensuring a beautiful, pillowy rise.
✔ The butter is incorporated gradually—a technique that takes patience but is essential to prevent the dough from becoming greasy. Brioche dough is incredibly rich, with over 55% butter by flour weight, meaning it must be mixed with absolute precision to develop the right gluten structure.
✔ We use a touch more yeast than traditional French bakeries—not because we’re cutting corners, but because home bakers don’t have the perfect humidity-controlled proofing boxes found in high-end pastry kitchens. This small adjustment ensures the brioche rises reliably, even in unpredictable home conditions.
✔ Cold fermentation (the secret to the best brioche). Once the dough is mixed, it rests in the refrigerator overnight (or up to 48 hours!). This allows the flavors to develop beautifully while making the dough much easier to handle.
✔ We bake at 356°F (180°C), just slightly higher than some bakery formulas, to create a perfectly browned crust without overbaking the delicate crumb. The result? An impossibly tender, buttery interior with a deep golden exterior that practically shimmers.
Why You Shouldn’t Skip Any Step
If you want authentic, bakery-quality brioche, every step matters.
Skipping the cold proof? You’ll lose half the flavor.
Mixing in butter too fast? Your dough will collapse.
Overbaking? You’ll end up with dry bread instead of a rich, custardy crumb.
Brioche isn’t a recipe you rush through—but when done correctly, it is hands-down one of the most rewarding breads to make.
So if you’re willing to take your time, embrace the technique, and trust the process, get ready for the most incredible homemade brioche you’ve ever had.
The Taste Test: Pure Heaven
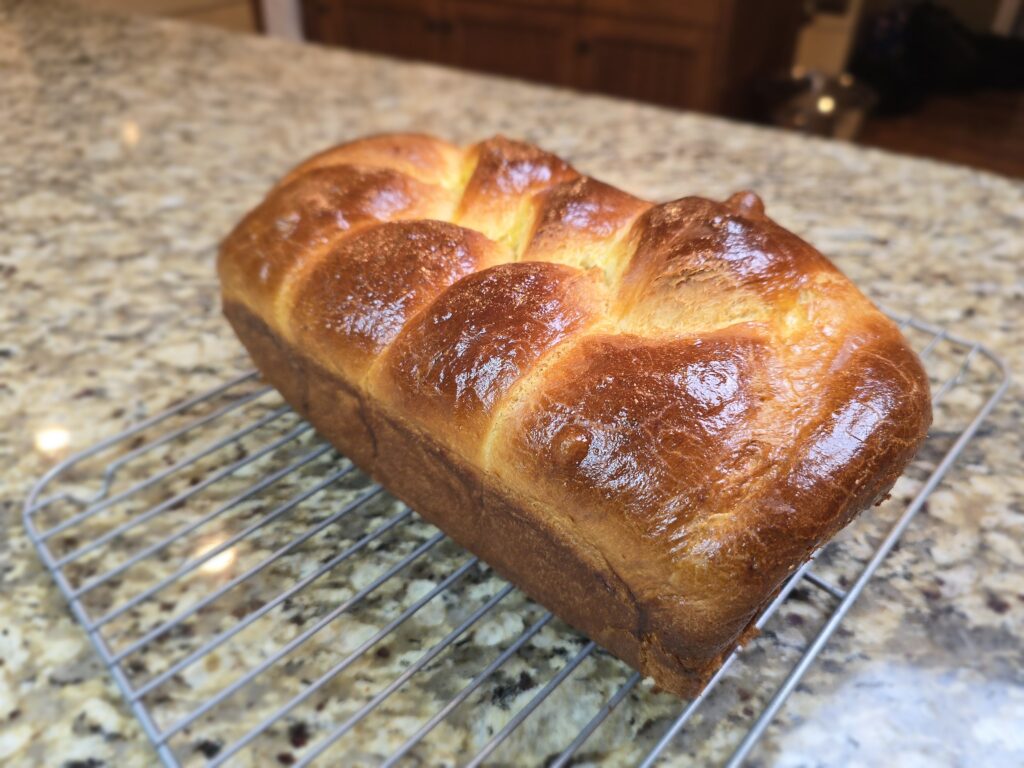
Imagine tearing into a fresh loaf—the golden, flaky crust giving way to a feather-light, buttery crumb. The aroma alone is intoxicating: rich, sweet, and warm with hints of caramelized sugar.
Each bite is silky yet structured, the kind of bread that dissolves on your tongue but never feels too delicate to hold its shape.
✔ It’s rich but never heavy.
✔ Light but never dry.
✔ Sweet but not overpowering.
It’s the ultimate indulgence, a bread so decadent that it hardly needs a topping—though a slather of butter or a spoonful of honey never hurts.

The Best Brioche
Ingredients
- Sponge (Pre-Ferment)
2 oz milk, about 1/4 cup (110°F)
10g instant yeast, about 3 tsp (1 TBSP)
2 oz bread flour, about 1/3 cup + 2 TBSP, gently spooned in the cup measure and leveled; never just scooped out of the bag
- Dough
3 large eggs, at room temperature
8 oz bread flour, about 1 1/2 cup plus 2 TBSP, gently spooned in the cup measure and leveled; never just scooped out of the bag
1/4 cup granulated sugar
1/2 heaping tsp kosher salt
11 TBSP unsalted butter, about 5.5 oz (156g), softened but not melted
- Egg Wash
1 large egg
1 TBSP heavy cream
Directions
- Make the Sponge:
Warm the milk to 110°F (43°C) using a microwave or stovetop. The milk should feel warm to the touch but not hot.
Mix the yeast and flour: In a small bowl, combine the warm milk, yeast, and bread flour. Stir just until no dry flour remains.
Let it proof: Cover the bowl with plastic wrap or a towel and let it rest in a warm spot (about 75°F/24°C) for 30 minutes, or until it has doubled in size and looks bubbly. - Prepare the Dough:
Set up the mixer: Attach the paddle attachment to your stand mixer.
Incorporate the eggs: Add the sponge to the bowl. Turn the mixer to low speed and add the eggs one at a time, allowing each to mix in before adding the next.
Add dry ingredients: With the mixer still on low, add the bread flour, then the sugar, followed by the salt. Let the mixer run for 5 minutes to begin developing gluten.
Incorporate the butter gradually: With the mixer running on low, add one cube of softened butter at a time, waiting until each piece is fully absorbed before adding the next.Note: The dough will be very sticky at this stage—this is normal.
Switch to the dough hook: Once all the butter is incorporated, remove the paddle and switch to the dough hook.
Knead until smooth and elastic: Mix on medium speed for about 15 minutes, or until the dough pulls away from the sides of the bowl. The dough should be soft, slightly sticky, and able to pass the “windowpane test” (when stretched, it forms a thin translucent membrane without tearing).
Shape into a ball: Using a bowl scraper or oiled hands, gently fold the edges of the dough toward the center to form a smooth, round shape. - First Rise & Cold Proof:
First rise (warm proof): Transfer the dough to a buttered bowl, seam side down. Cover with a towel and let it rest in a warm place (about 75°F/24°C) for 60 minutes, or until noticeably puffy.
Cold proof (for better flavor and texture):
After 60 minutes, cover the bowl tightly with plastic wrap and place it in the refrigerator.
Chill for at least 2 hours, but preferably overnight (8-12 hours, up to 48 hours).
Note: Chilling the dough makes it easier to handle and enhances the flavor. - Shaping & Final Proof:
Prepare the dough: Remove the dough from the refrigerator and turn it out onto a lightly floured surface. I usually turn it onto parchment paper VERY lightly floured.
Divide into three equal pieces: Weigh the dough to ensure even pieces for an even braid.
Shape the strands: Roll each piece into a long strand about 1 ½ times the length of your bread pan.
If the dough resists stretching, let it rest for 5 minutes, then try again.
Braid the dough: Lay the three strands side by side.
Braid them together, pinching the ends to seal.
Tuck the ends underneath for a neater appearance.
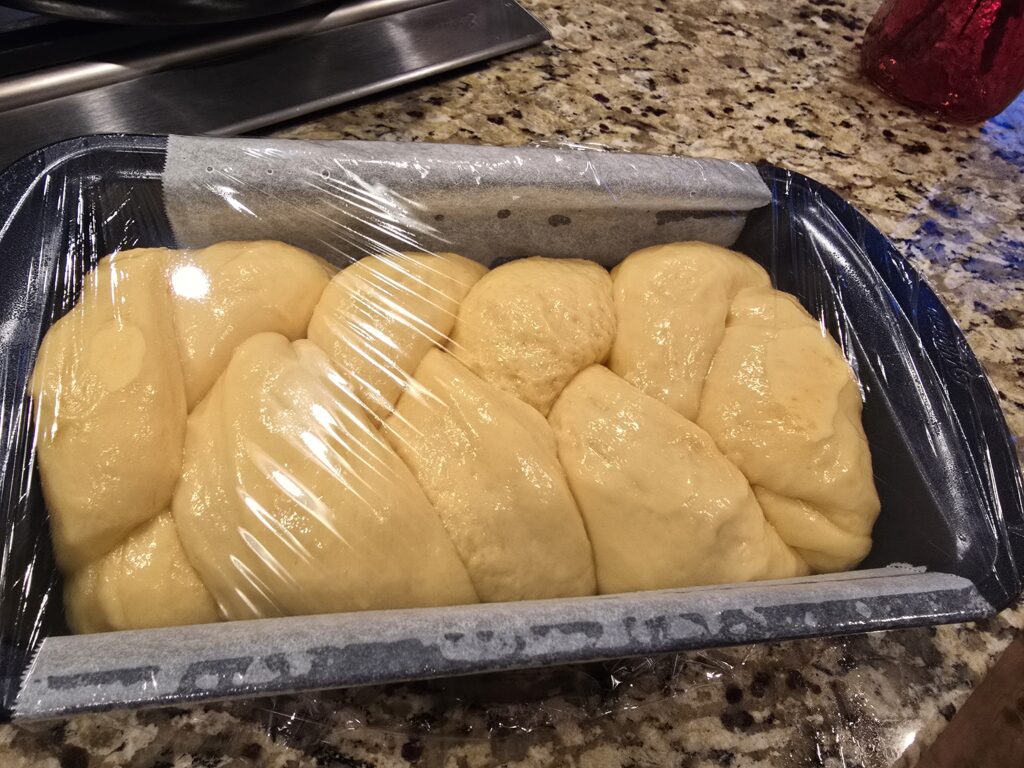
Transfer to a pan: Line a 5”x9” non-stick bread pan with parchment paper, letting the sides of parchment overhang so you can later pull your bread out with easy. Place the braded dough inside.
Final rise: Cover loosely with plastic wrap and let the dough proof at 75-90°F (24-32°C) for 60-90 minutes, or until almost doubled. Test for readiness: Gently press a finger into the dough—if the indentation slowly springs back halfway, it’s ready. If it bounces back immediately, let it rise longer. The dough will be quite noticeably puffed when it's ready. - Baking:
Preheat the oven to 356°F (180°C). Position an oven rack in the lower half to prevent excessive browning.
Make the egg wash: Whisk together 1 egg + 1 TBSP heavy cream.
Apply the egg wash: Using a pastry brush, gently coat the surface of the dough with the egg wash. This gives the brioche its signature deep golden, glossy crust.
Bake the loaf: Bake for 23-30 minutes, checking the internal temperature at 23 minutes.
The brioche is done when it reaches 188-190°F (86-88°C) internally, when tested in the middle of the bread with an instant thermometer.
It’s best to aim for an internal temperature of 190°F, as that typically indicates the brioche is fully baked and set. However, if you’re concerned about dryness and want a softer texture, you could pull it out just slightly below—around 188–190°F—but no lower. This will help ensure it’s baked through without losing too much moisture. If it’s under 185°F, the inside may still be underdone, so don’t go too low. If you end up pulling the bread under 190°F, just be sure that it’s set enough that the center isn’t raw or underbaked. Whatever you do, do not go over 195°F, or it will loose its softness.
Carefully remove the bread from the pan and transfer it to a cooling rack.
Allow it to cool for at least 5-7 minutes before slicing for the best texture.
Notes
- This brioche is light, buttery, and rich, with a soft, feathery crumb. It uses a sponge (pre-ferment) for better flavor and structure, and a cold fermentation to deepen its complexity.
- Serving & Storage
Enjoy the brioche warm or at room temperature.
Store at room temperature, wrapped well, for 2-3 days.
For longer storage, slice and freeze in an airtight bag for up to 2 months.
Best uses: Fresh, toasted with butter, or made into French toast, bread pudding, or sandwiches. - Final Notes
✔ Cold fermentation is key for the best flavor and structure.
✔ Soft but structured dough—kneading is crucial to develop strength before adding butter.
✔ Temperature control is important—avoid proofing in overly warm spots to prevent excessive spreading.
Enjoy your perfectly golden, buttery brioche!