Please read notes before proceeding with this recipe.
Peel potatoes and chop into 1.5 inch chunks. Place in a pot of cold water, add some salt. Bring to boil, reduce the heat to medium, cover and simmer for 25-30 minutes until very tender. Drain the potatoes reserving the potato water (SEE NOTE.) Cover the drained potatoes and let them sit for a minute or so. They will steam a bit for lighter texture. Gently mash the potatoes with a potato masher until very smooth.
Gently fold in some butter, shredded cheese, onion powder and some salt (remember, cheddar cheese is quite salty so you may not need a lot of salt.) You are looking for smooth texture that you can roll in a ball. You don't want your potatoes too firm, but you also don't want them too runny. They should be soft yet hold their shape to be rolled into a ball. Add a smalls plash of milk milk, sour cream or cream cheese, if needed to reach the right texture. Handle the potatoes gently while mixing to retain their fluffy texture and avoid gumminess. Cover your potatoes with a lid slightly ajar to cool them slightly yet avoid drying them out.
In a bowl of your stand mixer, mix egg, salt, sour cream and reserved potato water until well combined.
Make sure your potato water is not hot or it will scramble the egg. It's okay if your potato water is warm - just be sure to whisk everything together as soon as you add it, since gradually warming the egg will prevent it from scrambling.
Add 1 cup of flour and mix it with a fork until combined. Add another 3/4 cup and start kneading with the dough hook. At this point, switch to a spoon and start adding your flour one tablespoon at a time until the dough no longer sticks to the side of the bowl. If you add too much flour, the dough may be too dense, but not adding enough flour will also pose a problem and result in sticky unworkable dough. After you have observed the dough is no longer sticking to the bowl, mix it with your hands a couple of times (stop the mixer first,) ensuring it's not sticky, and when you are satisfied knead on low (speed 2) for about 2 minutes until the dough is smooth and elastic. Do not over knead. The amount of flour needed will generally vary between 2 cups and 2 1/4 cups, sometimes even humid weather outside can affect the exact amount of flour needed.
You can easily do this step by hand! You may need to knead for a bit longer if doing it by hand.
Let the dough rest on the counter, tightly covered with plastic wrap for 30-60 minutes. This is very important in order for the glutens in your dough to relax and for the dough to be soft and easy to work with.
Roll the dough out on lightly floured surface to 1/8" thickness, or just under; 3-4mm. With a 3" cookie cutter cut the dough into rounds. Remove scraps, if you plan to re-use them to roll more perogies, gently knead them back into smooth dough, cover with plastic wrap and let rest for 15-30 minutes. Figure out how much filling you can comfortably get in the middle of each dough round while still being able to seal it - it will likely be about 1 or 1.5 teaspoons. The goal is to add a generous amount of filling, while still being able to pull the dough over it and seal it; if the filling gets into the edge - it won't seal properly. So find the maximum amount of filling you can use without jeopardizing the seal.

Roll the filling into balls. It helps to roll the filling, as this way it won't get all over your fingers and get into the edge of your perogie rounds, making it difficult to seal.
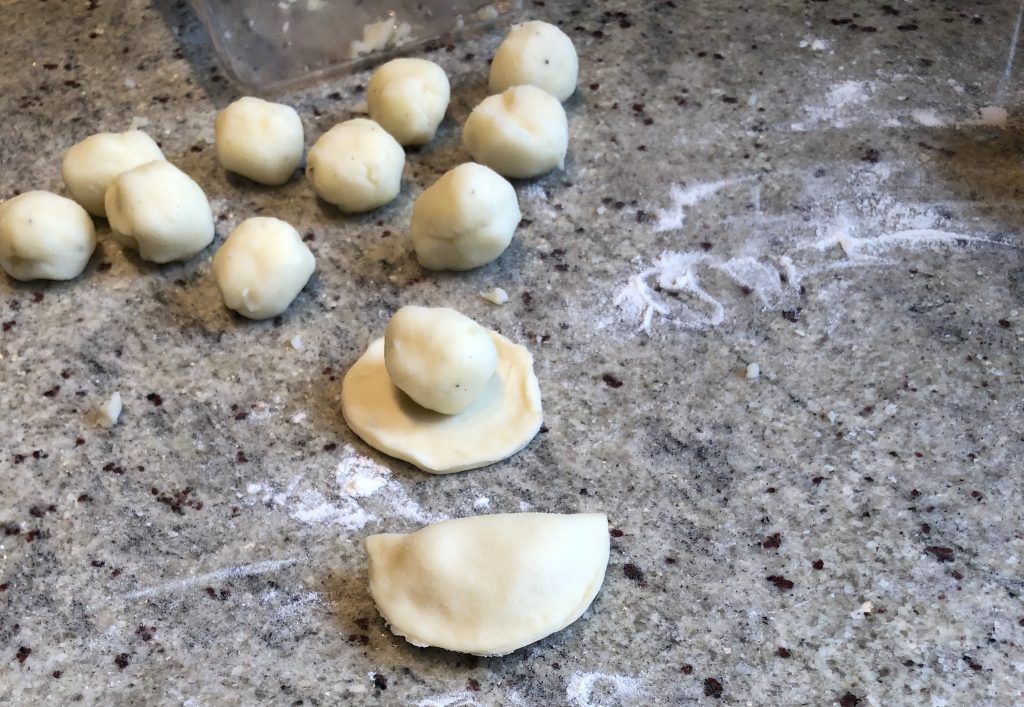
Turn each dough circle over. Think about it - the top of it is starting to dry out and it would be nearly impossible to seal while the side touching your counter space is nice and sticky. Place a ball of filling on top of your inverted dough circle.
Pull the edges of each perogie round together and pinch to seal. At this point, you are not crimping the edges, that will come later. Manipulate the filling and the shape of the perogie into the crescent shape. Set aside. Finish with the remaining dough circles.
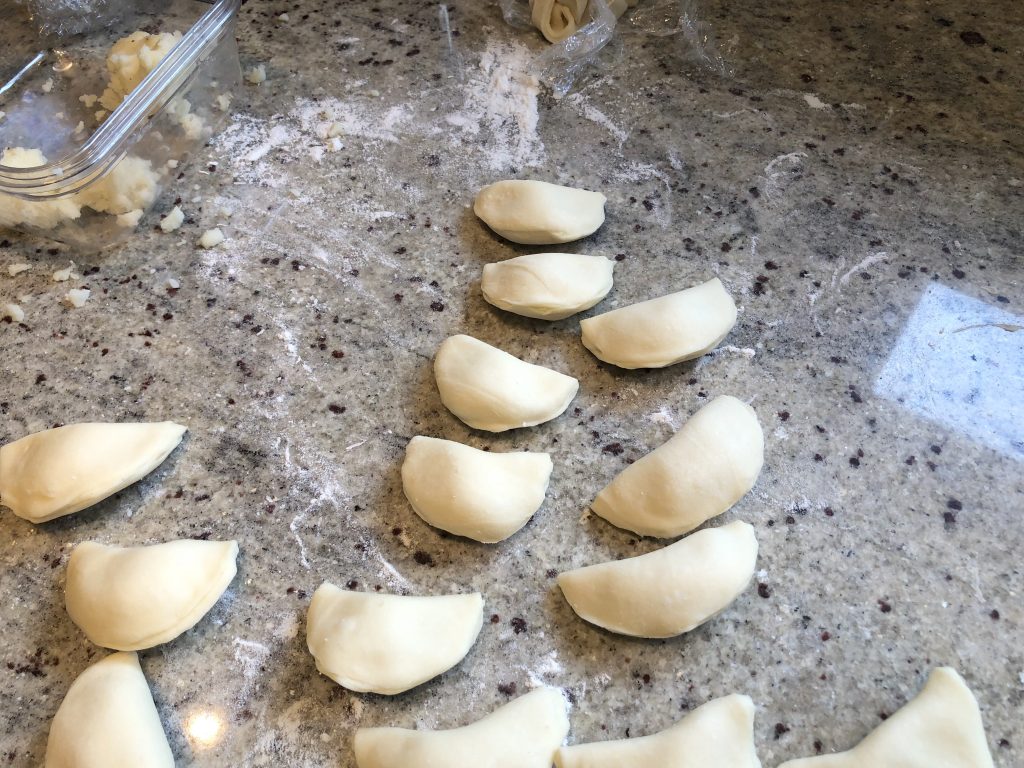
Now, that the edges of each perogie firmed up a bit, the gluten in them has relaxed and they even dried a bit - crimping the edges into a decorative pattern will be very easy to do. So proceed crimping each perogie with you index finger and your thumb in a pinch and twist motion. You will quickly get a hang of what looks good!
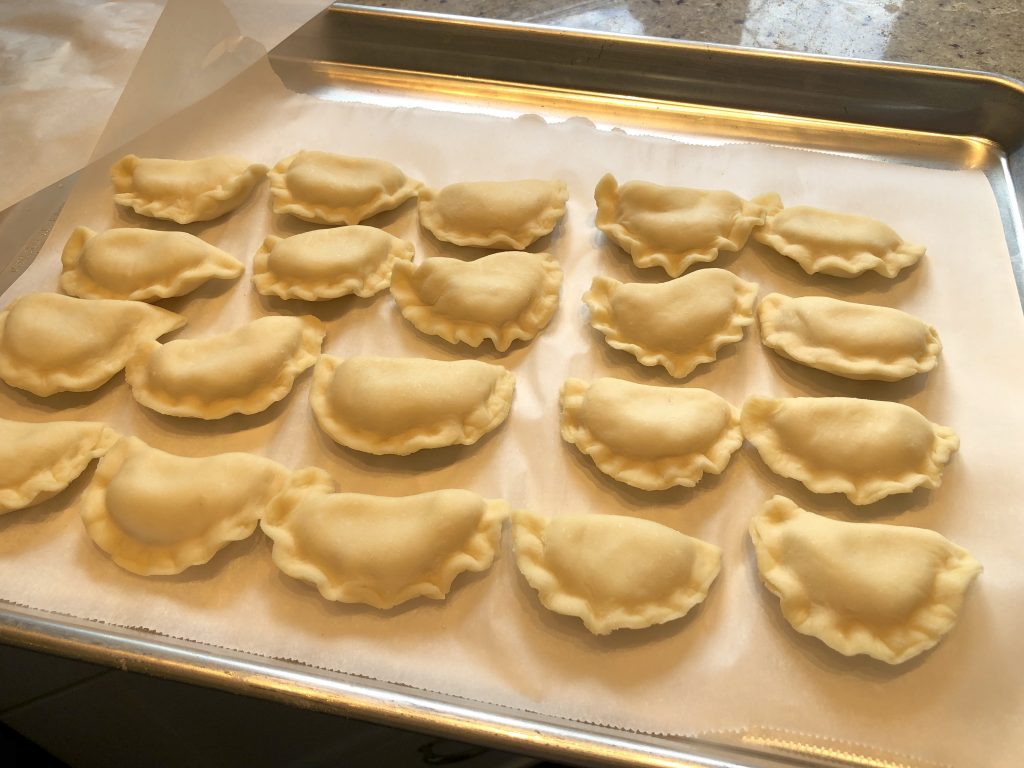
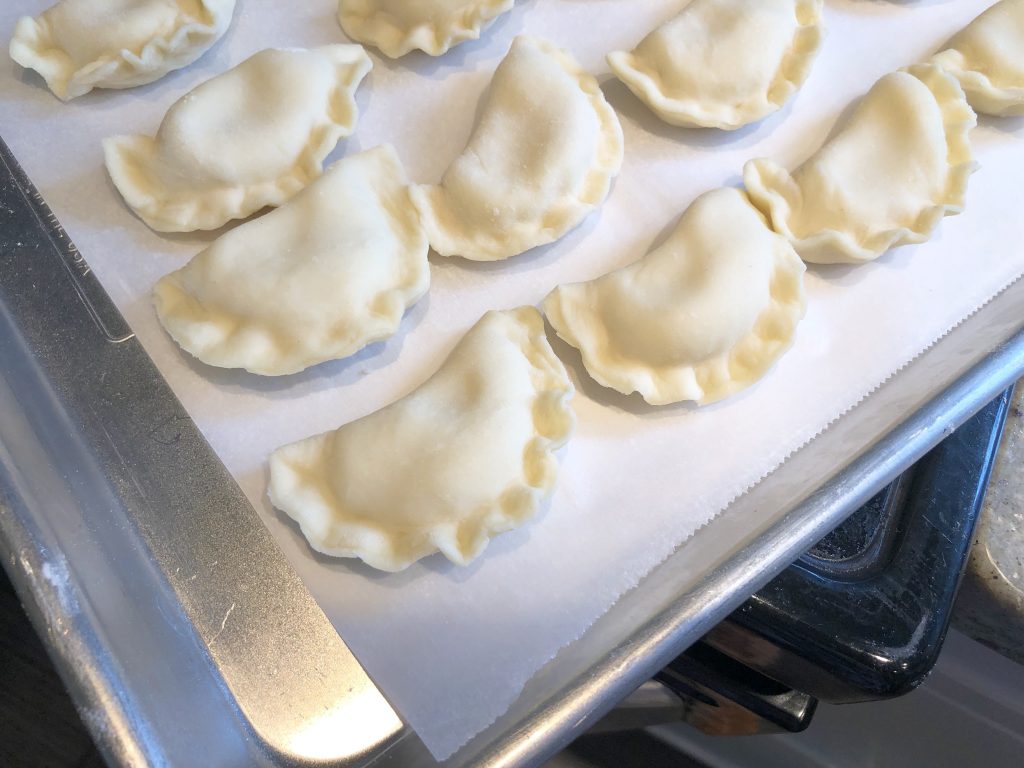
Proceed to the next step or flash freeze perogies by placing them in a single layer on a baking sheet and freezing for an hour or two; after that point transfer them to a large freezer bag or freezer-safe container.
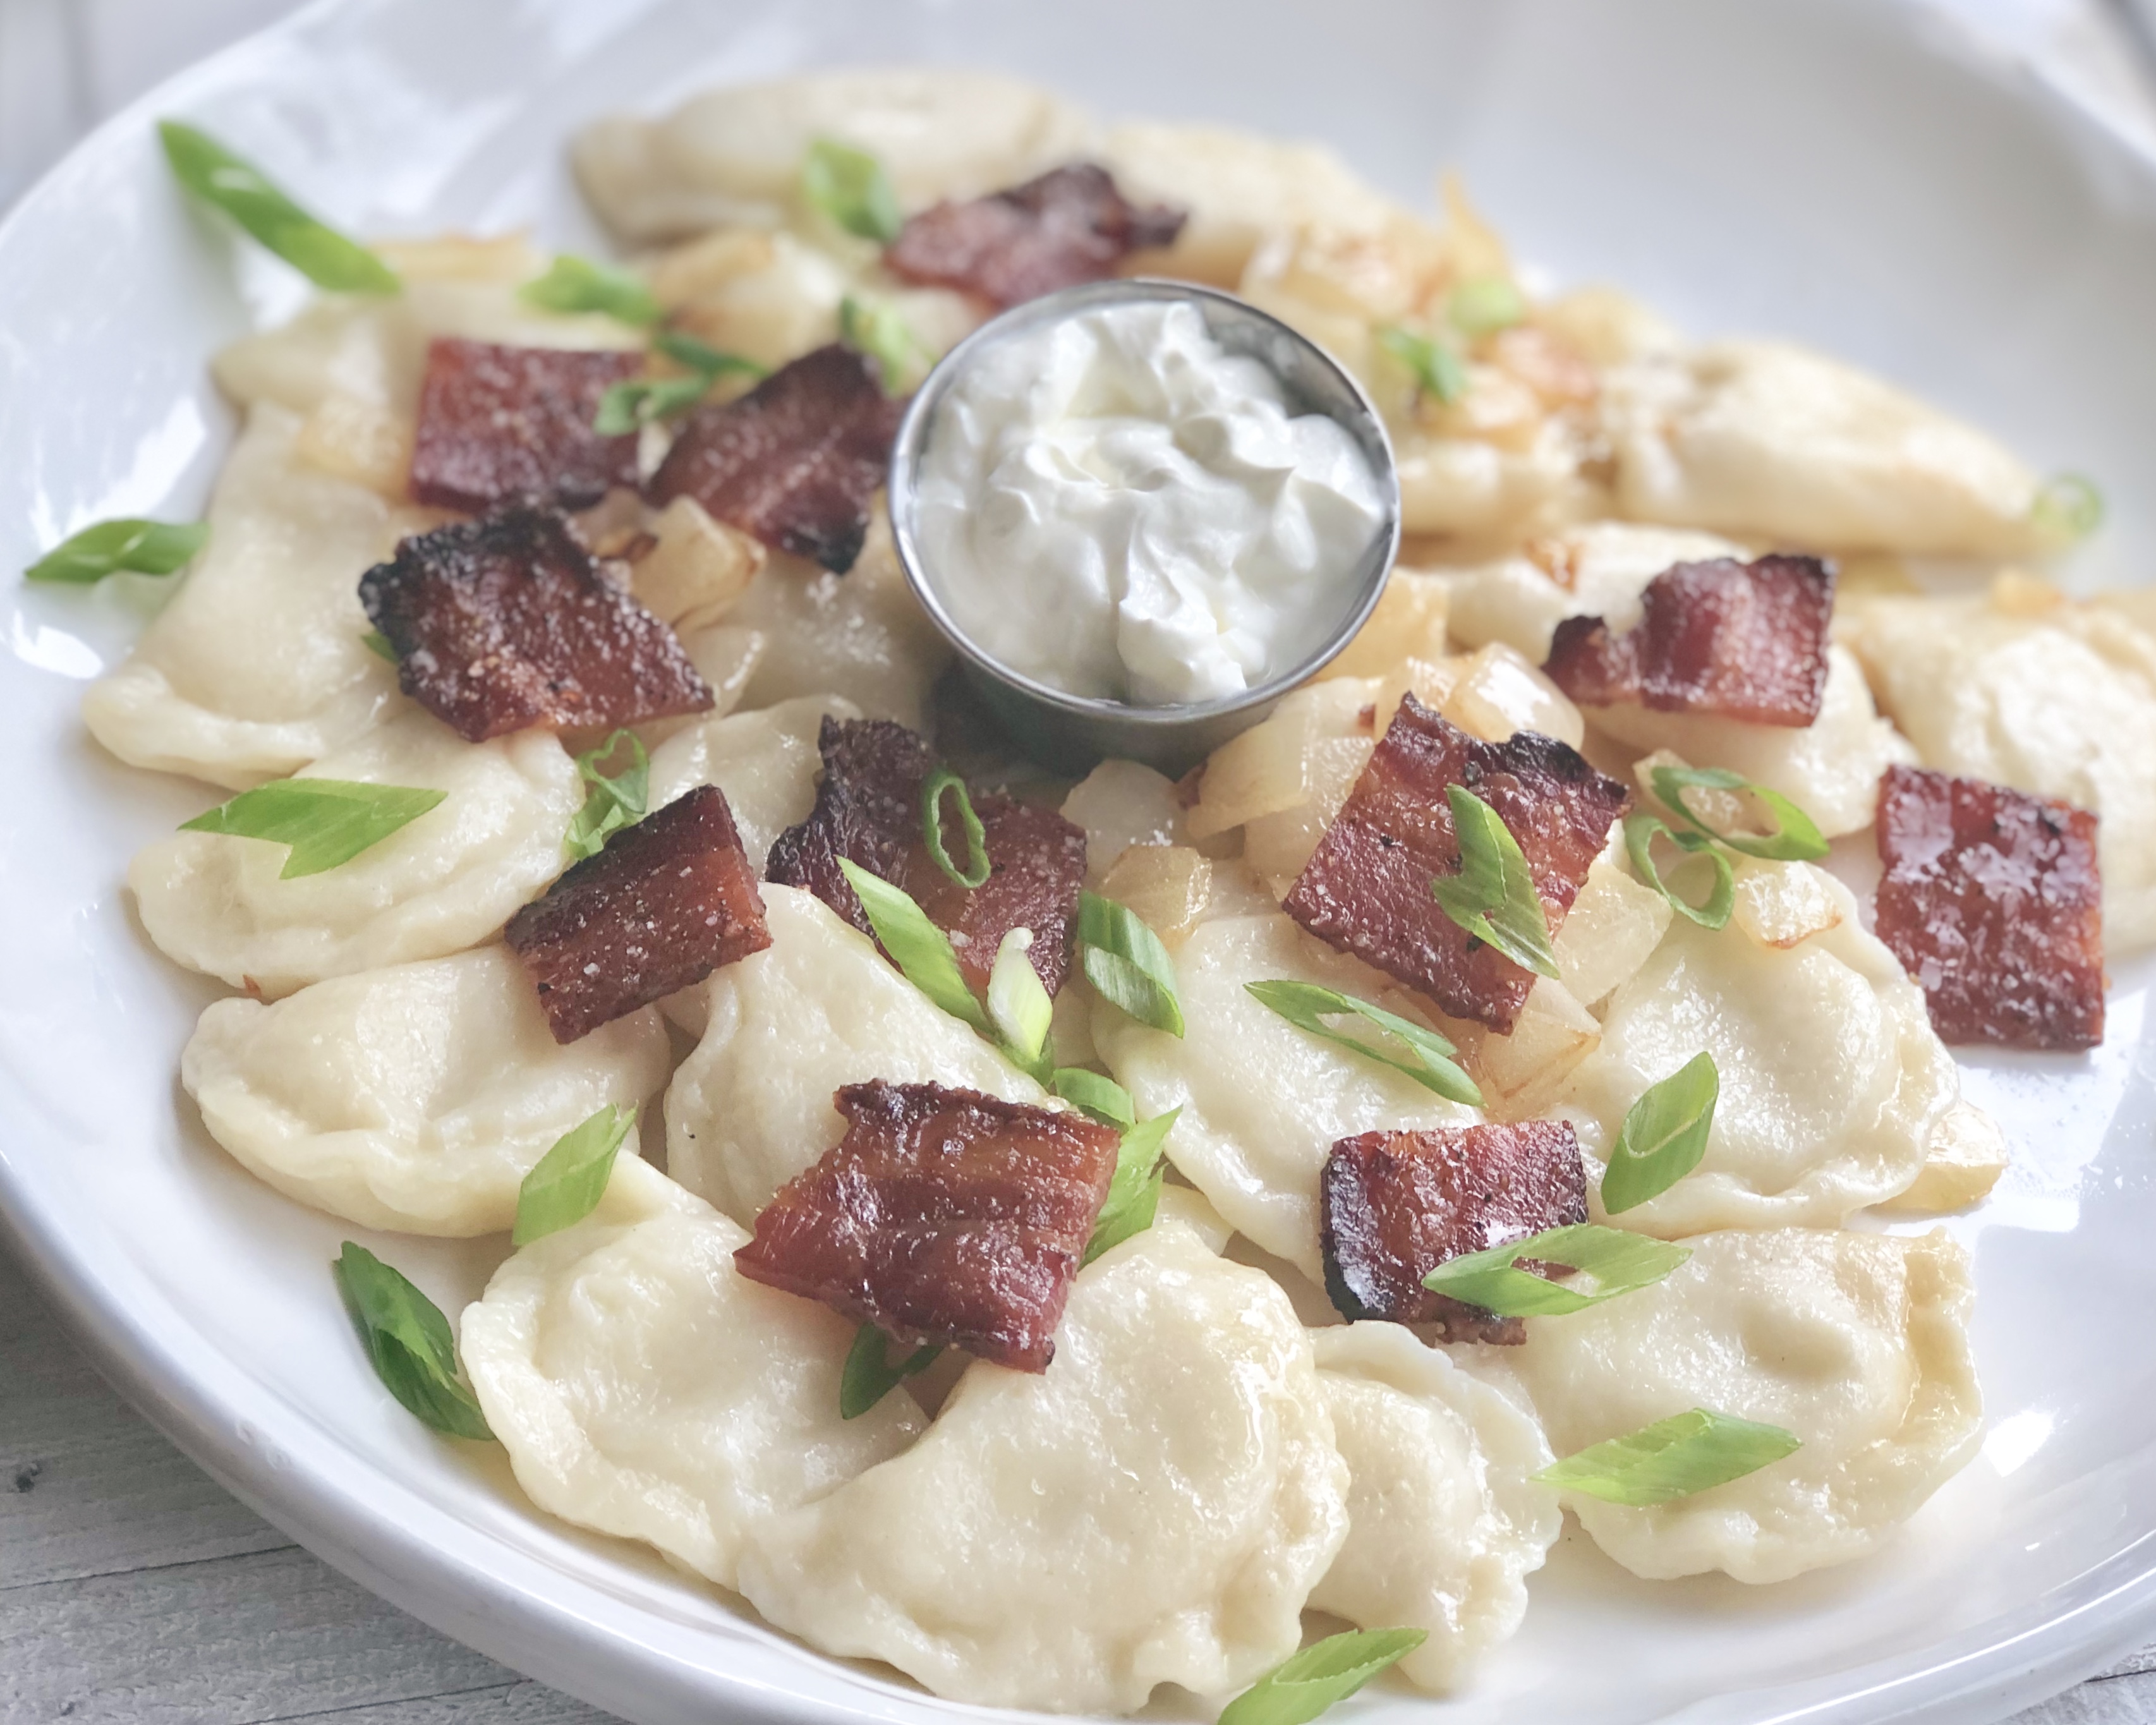
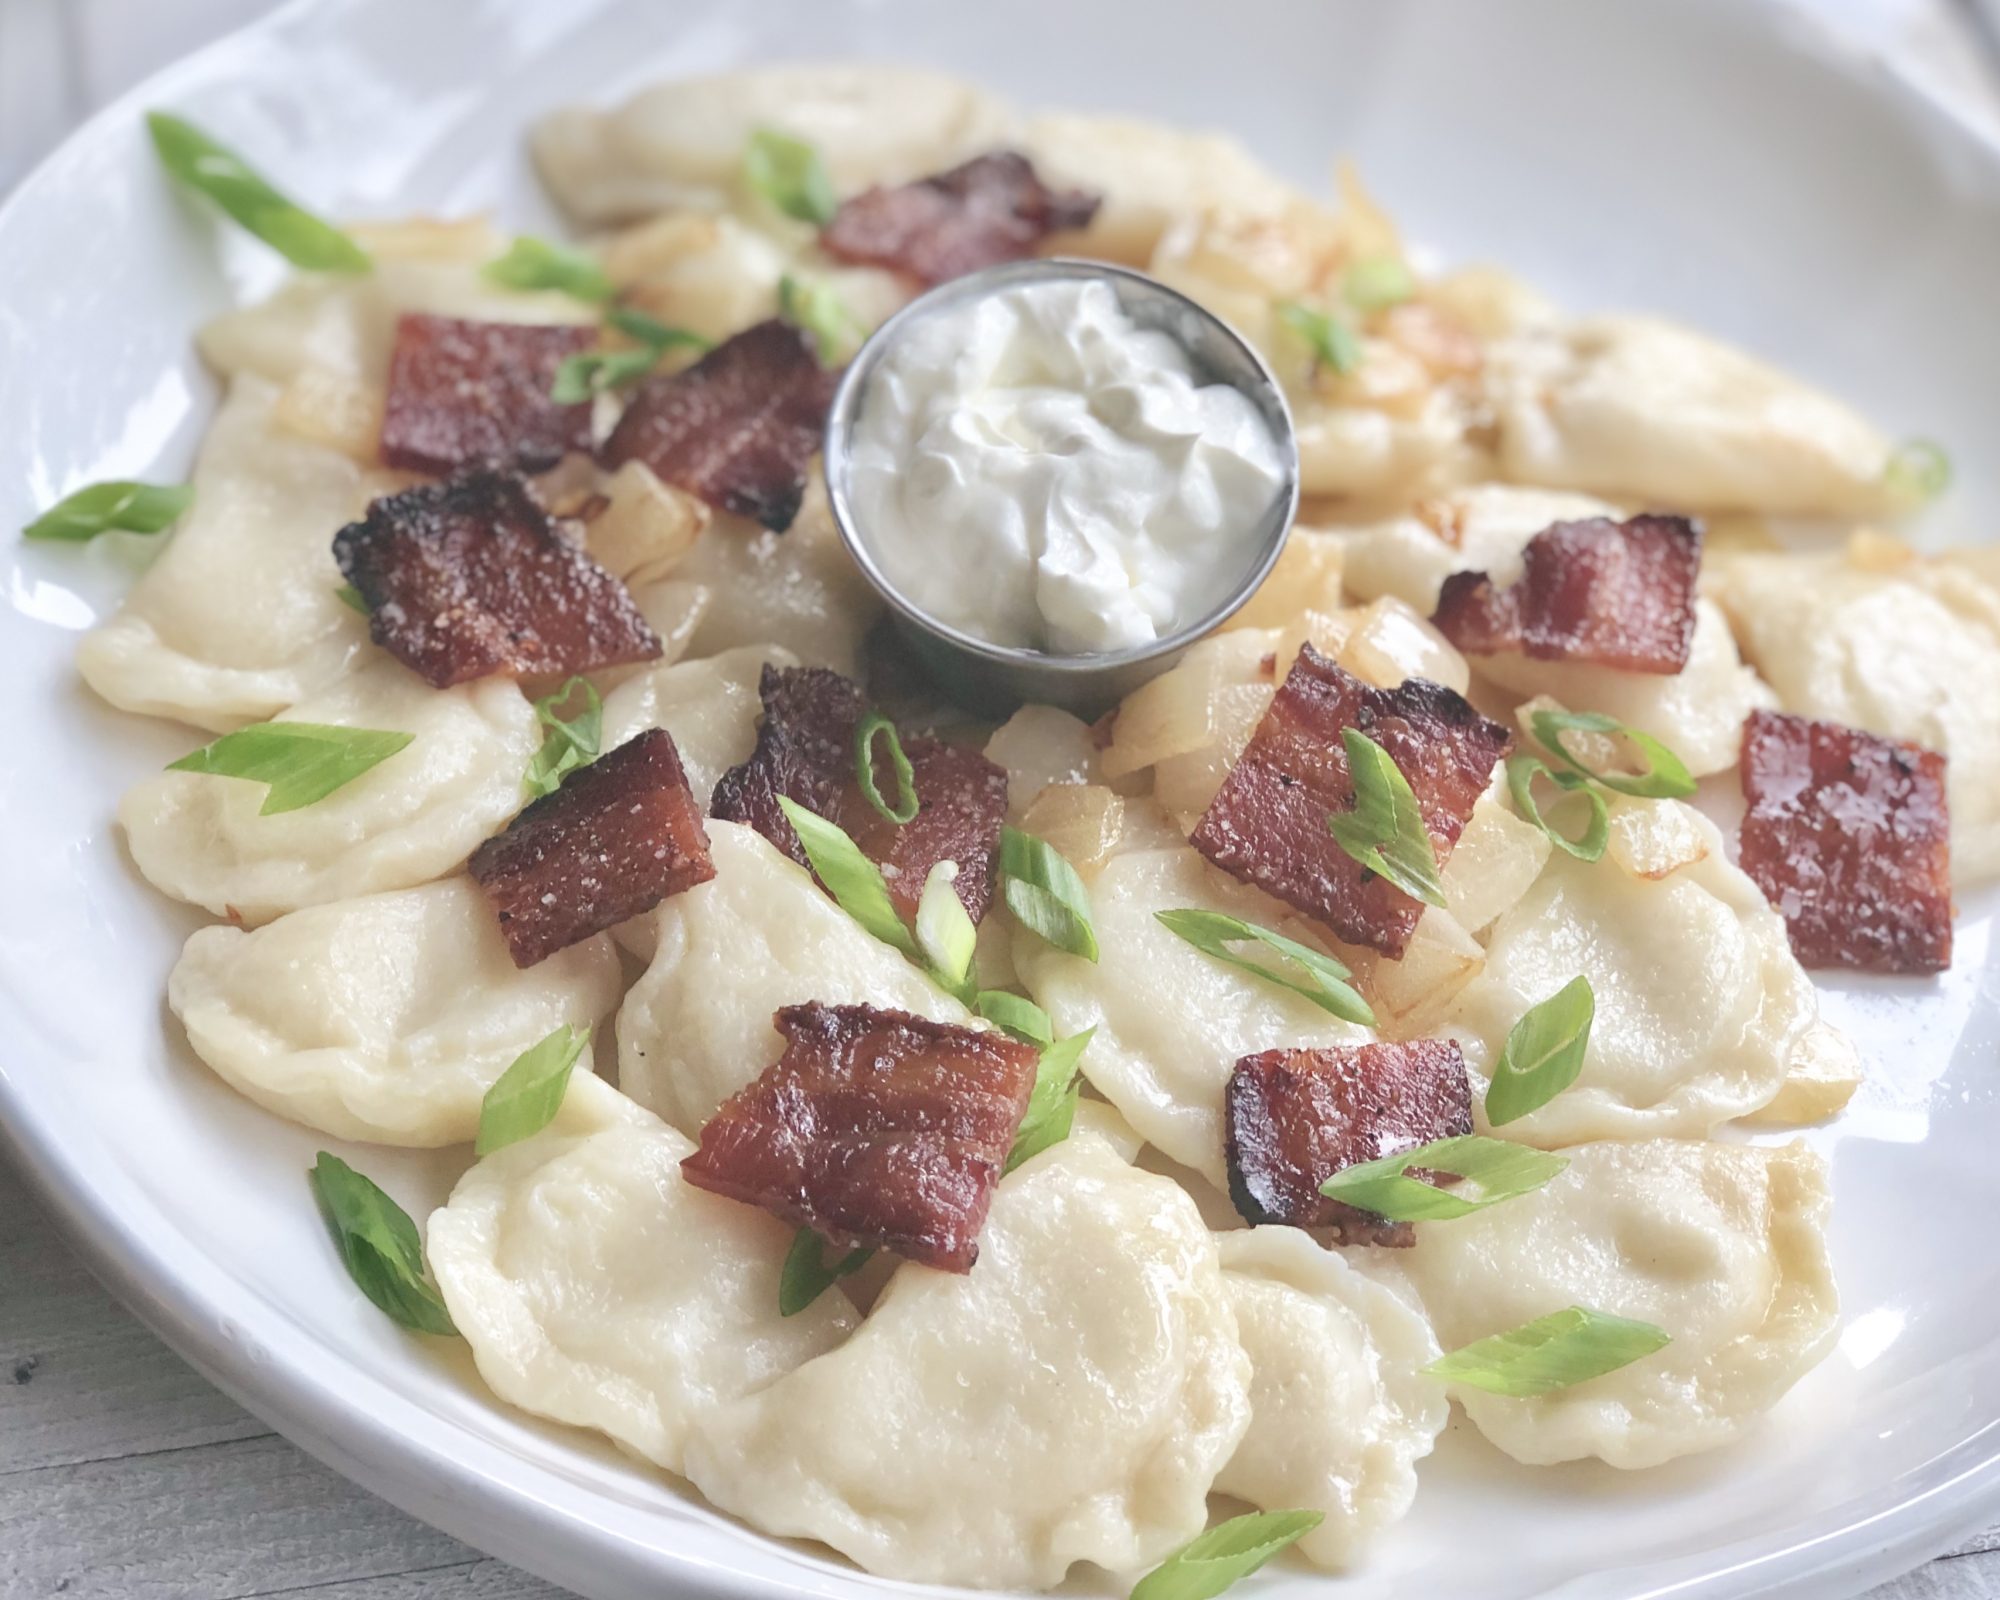
Bring a pot of salted water to boil. Add perogies to the pot. Once they float and the water returns back to a boil - cook them for 3-5 minutes until they are cooked through and the dough is tender. Serve them with your favourite garnishes. Traditionally these are served with some butter, sautéed onions and bacon.
In addition, after boiling, you may also fry your perogies on each side until golden. Enjoy
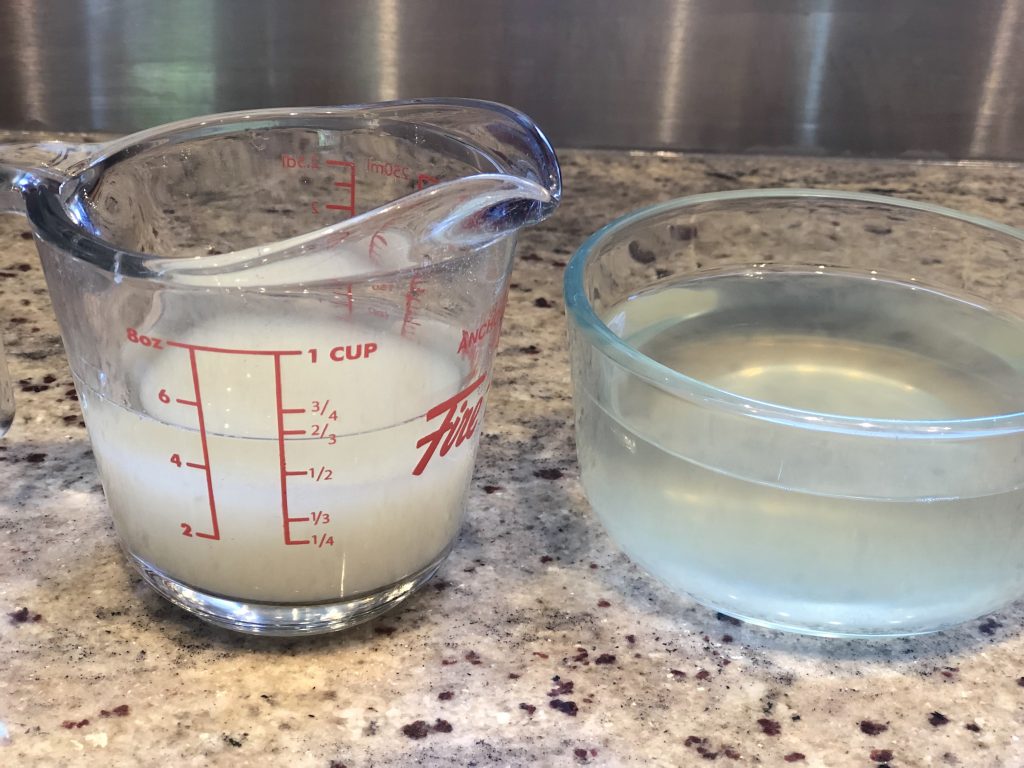
Potato water is very important as the potato starch in it will help the dough spread out easier and make it softer and easier to work with. Feel free to mash a good chunk of boiled potato into the water, to make the potato starch even more concentrated. Look at the picture attached. I separated my potato water - the starchiest water will be added to the dough.
This filling amount is a bit more than needed. You can probably get away with 2 potatoes, however, I always make 3 and just snack on leftovers. It's better than going through all the work and ending up not having enough.
Don't re-roll your dough more than once. The gluten will become quite overworked and your dough won't be as tender.
Get creative with your filling. My go to is cheddar cheese. But sometimes I use half white cheddar cheese and half mozzarella. I find the colour of white fluffy filling quite appetizing. Make sure to make your filling taste good - this is the star of your perogie. Ensure to add enough salt to it. Bland filling will result in a bland perogie. Sour cream adds a nice zing, so does cream cheese - so add enough to get a flavourful filling with the right texture.
Ingredients
Directions
Peel potatoes and chop into 1.5 inch chunks. Place in a pot of cold water, add some salt. Bring to boil, reduce the heat to medium, cover and simmer for 25-30 minutes until very tender. Drain the potatoes reserving the potato water (SEE NOTE.) Cover the drained potatoes and let them sit for a minute or so. They will steam a bit for lighter texture. Gently mash the potatoes with a potato masher until very smooth.
Gently fold in some butter, shredded cheese, onion powder and some salt (remember, cheddar cheese is quite salty so you may not need a lot of salt.) You are looking for smooth texture that you can roll in a ball. You don't want your potatoes too firm, but you also don't want them too runny. They should be soft yet hold their shape to be rolled into a ball. Add a smalls plash of milk milk, sour cream or cream cheese, if needed to reach the right texture. Handle the potatoes gently while mixing to retain their fluffy texture and avoid gumminess. Cover your potatoes with a lid slightly ajar to cool them slightly yet avoid drying them out.
In a bowl of your stand mixer, mix egg, salt, sour cream and reserved potato water until well combined.
Make sure your potato water is not hot or it will scramble the egg. It's okay if your potato water is warm - just be sure to whisk everything together as soon as you add it, since gradually warming the egg will prevent it from scrambling.
Add 1 cup of flour and mix it with a fork until combined. Add another 3/4 cup and start kneading with the dough hook. At this point, switch to a spoon and start adding your flour one tablespoon at a time until the dough no longer sticks to the side of the bowl. If you add too much flour, the dough may be too dense, but not adding enough flour will also pose a problem and result in sticky unworkable dough. After you have observed the dough is no longer sticking to the bowl, mix it with your hands a couple of times (stop the mixer first,) ensuring it's not sticky, and when you are satisfied knead on low (speed 2) for about 2 minutes until the dough is smooth and elastic. Do not over knead. The amount of flour needed will generally vary between 2 cups and 2 1/4 cups, sometimes even humid weather outside can affect the exact amount of flour needed.
You can easily do this step by hand! You may need to knead for a bit longer if doing it by hand.
Let the dough rest on the counter, tightly covered with plastic wrap for 30-60 minutes. This is very important in order for the glutens in your dough to relax and for the dough to be soft and easy to work with.
Roll the dough out on lightly floured surface to 1/8" thickness, or just under; 3-4mm. With a 3" cookie cutter cut the dough into rounds. Remove scraps, if you plan to re-use them to roll more perogies, gently knead them back into smooth dough, cover with plastic wrap and let rest for 15-30 minutes. Figure out how much filling you can comfortably get in the middle of each dough round while still being able to seal it - it will likely be about 1 or 1.5 teaspoons. The goal is to add a generous amount of filling, while still being able to pull the dough over it and seal it; if the filling gets into the edge - it won't seal properly. So find the maximum amount of filling you can use without jeopardizing the seal.
Roll the filling into balls. It helps to roll the filling, as this way it won't get all over your fingers and get into the edge of your perogie rounds, making it difficult to seal.
Turn each dough circle over. Think about it - the top of it is starting to dry out and it would be nearly impossible to seal while the side touching your counter space is nice and sticky. Place a ball of filling on top of your inverted dough circle.
Pull the edges of each perogie round together and pinch to seal. At this point, you are not crimping the edges, that will come later. Manipulate the filling and the shape of the perogie into the crescent shape. Set aside. Finish with the remaining dough circles.
Now, that the edges of each perogie firmed up a bit, the gluten in them has relaxed and they even dried a bit - crimping the edges into a decorative pattern will be very easy to do. So proceed crimping each perogie with you index finger and your thumb in a pinch and twist motion. You will quickly get a hang of what looks good!
Proceed to the next step or flash freeze perogies by placing them in a single layer on a baking sheet and freezing for an hour or two; after that point transfer them to a large freezer bag or freezer-safe container.
Bring a pot of salted water to boil. Add perogies to the pot. Once they float and the water returns back to a boil - cook them for 3-5 minutes until they are cooked through and the dough is tender. Serve them with your favourite garnishes. Traditionally these are served with some butter, sautéed onions and bacon.
In addition, after boiling, you may also fry your perogies on each side until golden. Enjoy
Potato water is very important as the potato starch in it will help the dough spread out easier and make it softer and easier to work with. Feel free to mash a good chunk of boiled potato into the water, to make the potato starch even more concentrated. Look at the picture attached. I separated my potato water - the starchiest water will be added to the dough.
This filling amount is a bit more than needed. You can probably get away with 2 potatoes, however, I always make 3 and just snack on leftovers. It's better than going through all the work and ending up not having enough.
Don't re-roll your dough more than once. The gluten will become quite overworked and your dough won't be as tender.
Get creative with your filling. My go to is cheddar cheese. But sometimes I use half white cheddar cheese and half mozzarella. I find the colour of white fluffy filling quite appetizing. Make sure to make your filling taste good - this is the star of your perogie. Ensure to add enough salt to it. Bland filling will result in a bland perogie. Sour cream adds a nice zing, so does cream cheese - so add enough to get a flavourful filling with the right texture.